How To Cut A Fringe: Your Guide To A Fresh Look At Home
Detail Author:
- Name : Mr. Bart Kling V
- Username : theresa27
- Email : labbott@hotmail.com
- Birthdate : 1998-10-25
- Address : 46026 Christiansen Fords Apt. 498 Beierside, IL 66833
- Phone : +1 (801) 590-2297
- Company : Legros, Raynor and Mitchell
- Job : Athletes and Sports Competitor
- Bio : Eligendi voluptatibus dolor eveniet. Sit quibusdam quo repellendus aut voluptates. Nam aspernatur voluptatem porro sequi. Deserunt deleniti maxime tempora reiciendis itaque voluptatum ea.
Socials
instagram:
- url : https://instagram.com/rosanna3933
- username : rosanna3933
- bio : Impedit qui id aliquam et ea laudantium ducimus. Earum quas est saepe necessitatibus.
- followers : 3795
- following : 2894
linkedin:
- url : https://linkedin.com/in/lindr
- username : lindr
- bio : Culpa et ea sint dicta.
- followers : 886
- following : 2314
tiktok:
- url : https://tiktok.com/@rosannalind
- username : rosannalind
- bio : Illo voluptatem et id alias cum.
- followers : 4258
- following : 937
twitter:
- url : https://twitter.com/rosanna1049
- username : rosanna1049
- bio : Et qui nemo sed eum ut debitis sint. Non adipisci quia nihil impedit. Maiores pariatur libero ullam illo ut. Nobis rerum consequuntur numquam qui.
- followers : 744
- following : 321
facebook:
- url : https://facebook.com/rosannalind
- username : rosannalind
- bio : Est doloribus ut et quod sapiente molestiae ut quibusdam.
- followers : 5901
- following : 580
Wanting a fresh new look can feel exciting, can't it? Sometimes, just a simple change, like adding a fringe, makes all the difference. That little bit of hair framing your face can completely transform your style, offering a soft touch or a bold statement. It's almost like a quick makeover without the big commitment of a full haircut.
Thinking about doing it yourself might seem a bit scary, that's true. Lots of people wonder if they can actually pull off a DIY fringe. But with the right guidance and a little bit of patience, it's actually something you can absolutely do at home. It’s about taking those small, careful steps, much like how a big, organized group, for instance, the CUT, works with precision to achieve its goals, as a matter of fact.
So, if you're ready to give yourself a lovely new fringe, whether it's a neat straight one, a soft wispy style, or those popular curtain bangs, this guide is here for you. We'll go through everything you need to know, making sure you feel ready and confident for your hair adventure today, November 19, 2023.
Table of Contents
- Why Cut Your Own Fringe?
- Getting Ready: What You'll Need
- Preparing Your Hair for the Cut
- Start with Clean, Dry Hair
- Sectioning Your Fringe Area
- Isolating the Hair
- Step-by-Step: Cutting Different Fringe Styles
- The Classic Straight Fringe
- Soft, Wispy Fringe
- Effortless Curtain Bangs
- Important Tips for a Successful Fringe Cut
- Fixing Common Fringe Mistakes
- Maintaining Your Fresh Fringe
- Frequently Asked Questions About Cutting Fringes
Why Cut Your Own Fringe?
There are quite a few good reasons why someone might want to cut their own fringe. For one thing, it saves money, obviously. Salon visits can add up, and a fringe trim is something you often need to do pretty regularly. Doing it yourself means you can keep your look fresh without spending extra cash, so there's that benefit.
Another big reason is the sheer convenience. You don't have to schedule an appointment or travel anywhere. When you feel like a change, or your fringe just gets a bit too long, you can simply grab your tools and get to it right then and there. It's very much about having control over your own style, in a way.
Plus, there's a real sense of achievement that comes with doing something like this yourself. It’s like, you know, a personal victory. You get to express your creativity and see your vision come to life right in your own mirror. It's quite empowering, actually, to take charge of your own hair and make it look just how you want it.
Getting Ready: What You'll Need
Before you even think about picking up scissors, you need to gather your tools. Having the right stuff makes a huge difference in how your fringe turns out. It's like preparing for any big project; you need the proper equipment to get the job done right, you know?
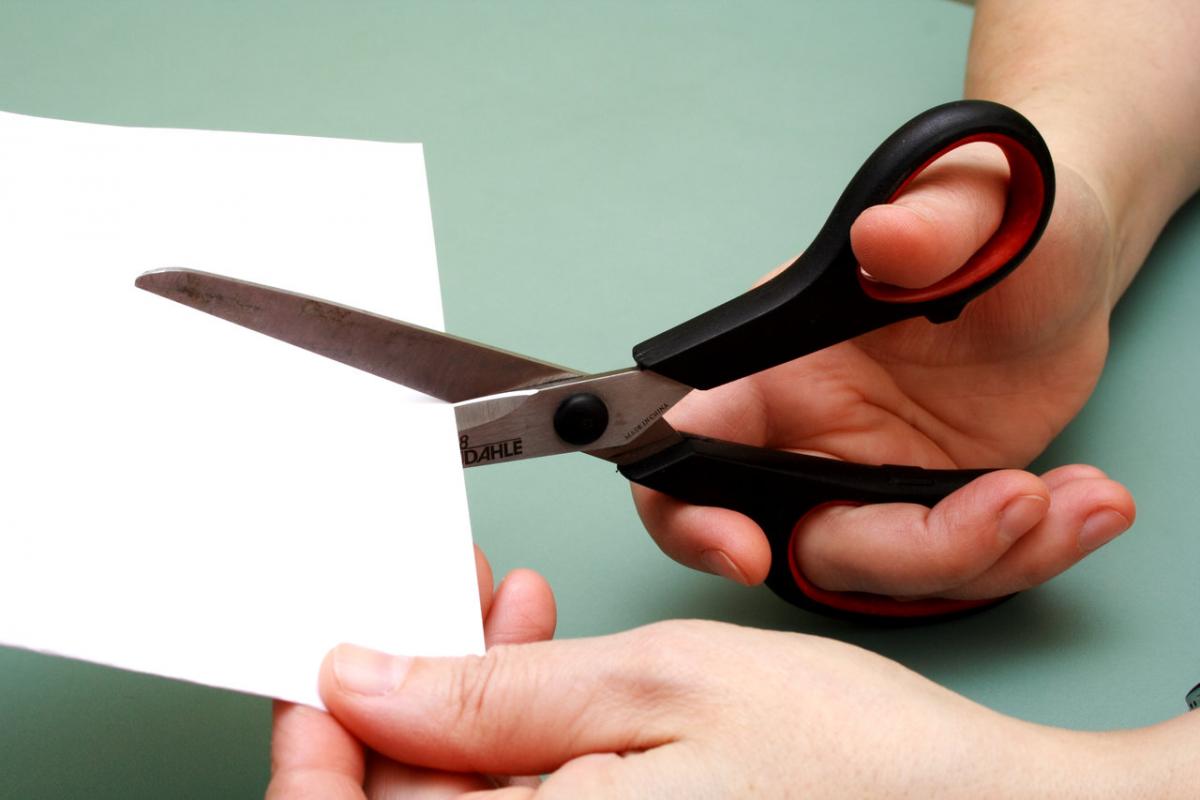
First off, get yourself some really sharp scissors. Not kitchen scissors, honestly. Those are too dull and can actually damage your hair, making the ends split. You want proper hairdressing shears. They are designed to make clean, precise cuts, which is pretty important for a neat fringe. You can find these at beauty supply stores or online, and they don't have to be super expensive, just good quality.
You'll also need a fine-tooth comb. This helps you section your hair neatly and comb it straight, which is absolutely key for an even cut. A spray bottle filled with water can be helpful too, especially if you plan to dampen your hair slightly for certain styles, or just to make it more manageable. It’s pretty useful for getting things just so.
Hair clips or ties are a must-have for keeping the rest of your hair out of the way. You really don't want to accidentally snip a piece of hair that's not supposed to be part of your fringe. A good mirror, or even two mirrors if you can manage it, will help you see what you're doing from different angles. Good lighting is also super important; you need to see every strand clearly to avoid any surprises, basically.
Finally, grab an old towel or a cutting cape to put over your shoulders. This keeps stray hairs off your clothes and floor, making cleanup much easier. It's a small step, but it makes the whole process less messy, and that's always a good thing, right?
Preparing Your Hair for the Cut
Getting your hair ready is just as important as the cutting itself. Think of it as laying a solid foundation for your new look. Skipping these steps can lead to uneven results, and nobody wants that, do they?
Start with Clean, Dry Hair
For most fringe styles, especially if you're going for a straight or blunt look, it's best to start with clean, dry hair. Wet hair stretches, and when it dries, it shrinks up, which means your fringe could end up much shorter than you intended. This is a very common mistake, so pay attention to this detail. If you absolutely must dampen it, only make it slightly damp, and always remember it will spring up a bit when dry.
Clean hair is also easier to work with because it's free of product buildup that can make it sticky or weigh it down. You want your hair to fall naturally so you can see its true length and how it behaves. This honestly helps a lot with accuracy.
Sectioning Your Fringe Area
This is where precision really comes into play. Use your fine-tooth comb to create a triangle section at the front of your head. The point of the triangle should be at the top of your head, and the two bottom points should be roughly where your eyebrows begin. This is typically the natural area for a fringe. Make sure your partings are clean and straight, as this will determine the width and thickness of your fringe. You can always make it a little narrower or wider later if you want, but start with a clear section.
Use your clips to secure all the hair outside of this triangle section. You want it completely out of the way, so there’s no chance of accidentally cutting it. This step is pretty important for keeping things tidy and focused on just the fringe hair.
Isolating the Hair
Once your fringe section is clear, comb it down smoothly over your forehead. Make sure there are no tangles or bumps. You want the hair to lie flat and natural, exactly how it would fall if you weren't holding it. This helps you get an accurate sense of the length you're aiming for. It's almost like you're visualizing the final shape before you even pick up the scissors, you know?
Some people like to twist their fringe section before cutting, but for beginners, it's generally better to keep it straight and flat. Twisting can make it hard to see exactly where you're cutting and can lead to an uneven result. So, for your first try, just keep it simple and straight, basically.
Step-by-Step: Cutting Different Fringe Styles
Now for the main event! Remember to take your time and cut slowly. You can always cut more hair off, but you can't put it back on. This is a pretty big rule to live by when doing any kind of hair cutting, to be honest.
The Classic Straight Fringe
For a classic, blunt fringe, hold the section of hair between your index and middle fingers, pulling it straight down. Decide on your desired length. A good rule of thumb is to aim for just below your eyebrows, as it will spring up a bit. Cut straight across, holding your scissors horizontally. Make tiny snips, almost like you're chipping away at the length, rather than one big chop. This is called point cutting, and it helps create a softer edge instead of a super harsh line, which is usually more forgiving. Just a little bit at a time is the way to go.
After your first pass, comb the fringe down again and check for evenness. You’ll likely see a few longer pieces. Go back and snip those tiny bits off. Keep checking and trimming until you're happy with the length and straightness. It's okay if it takes a few passes; precision takes time, after all. This is where that organized, step-by-step approach, like the kind of careful planning you see in large movements, really pays off.
Soft, Wispy Fringe
A wispy fringe is all about creating lightness and movement. Start by cutting your fringe to your desired length, similar to the straight fringe method, but maybe a touch longer. Then, instead of cutting straight across, hold your scissors vertically and snip into the ends of the fringe. This technique removes bulk and creates that soft, feathery look. You're basically thinning out the ends, so it's not a heavy block of hair.
Work in small sections, pointing your scissors into the hair, not across it. You can also take small vertical sections of your fringe and snip into the very ends, holding the scissors at an angle. This adds texture and helps the fringe blend more naturally. It’s pretty effective for a softer vibe, you know?
Comb it out and see how it falls. If it still feels too heavy, you can go back and do a little more vertical cutting. The idea is to create separation and airiness, so it doesn't look too solid. It's more about creating a delicate frame for your face, which can be quite charming, actually.
Effortless Curtain Bangs
Curtain bangs are very popular right now, and they are surprisingly easy to cut yourself. This style frames your face, parting in the middle and sweeping to the sides. First, section your hair into a triangle, but make the point of the triangle a bit further back on your head than for a straight fringe. This gives you more hair to work with for the longer, sweeping effect. You want the side pieces to be long enough to reach your jawline or chin, generally.
Comb the fringe section straight down. Now, here's the trick: instead of cutting straight across, you'll be cutting diagonally. Take the middle section of your fringe and decide how short you want the very center to be. This will be the shortest point. Then, angle your scissors downwards and outwards, cutting in a diagonal line from the center outwards, towards your jawline. You're creating a longer, sweeping shape on each side. It's almost like a gentle curve, you know?
Repeat on the other side, making sure the diagonal lines mirror each other. Once you've made your initial cuts, comb the hair out and check the symmetry. You can then go back and point cut into the ends to soften them and help them blend into the rest of your hair. This makes them look more natural and less blunt. They should look pretty effortless when you're done, as a matter of fact.
Important Tips for a Successful Fringe Cut
Even with the right steps, a few extra pointers can make your fringe-cutting experience much smoother and more successful. These little bits of advice can really help you avoid common pitfalls, which is always good, right?
First off, always, always cut less than you think you need to. You can always take more hair off, but you can’t put it back. This is probably the most important rule when cutting your own hair. It's better to have a fringe that's a tiny bit too long than one that's too short and makes you feel a bit sad. So, start small, basically.
Keep your head straight and look directly into the mirror. Tilting your head, even slightly, can make your fringe appear uneven once you straighten up. It’s a very common mistake, so be mindful of your posture. You want to see the true fall of your hair.
Check your work often. After every few snips, comb your fringe down and step back to assess the length and shape. This allows you to make small adjustments as you go, rather than realizing you've gone too far at the very end. It's a bit like checking your progress on a long journey, you know?
Don't stretch the hair while you're cutting it. Hair is elastic, and if you pull it taut, it will spring up once you let go, making your fringe shorter than you intended. Let it fall naturally and cut it in its relaxed state. This is pretty important for accuracy.
Work in small sections. Don't try to cut your entire fringe in one go. Divide it into smaller, manageable sections, especially if your hair is thick. This gives you more control and helps you achieve a more precise result. It's like tackling a big task by breaking it down into smaller pieces, which is usually easier, anyway.
Finally, don't rush the process. Take your time, be patient, and enjoy the experience. A rushed cut often leads to mistakes that are harder to fix. This isn't a race; it's about getting a lovely new look that you'll be happy with. So, just breathe and take it slow, you know?
Fixing Common Fringe Mistakes
Even with the best intentions, sometimes things don't go exactly as planned. But don't worry, most fringe mistakes can be fixed or grown out. It’s not the end of the world, basically.
If your fringe is too short, the best thing to do is usually to wait for it to grow out a bit. In the meantime, you can try styling it to the side, using hair clips, or incorporating headbands to hide the shorter pieces. Sometimes, a little bit of texture spray can help it look less "chopped" and more "styled." It’s pretty amazing what a bit of product can do, actually.
If your fringe is uneven, you can try to carefully trim the longer sections to match the shorter ones. Do this very slowly, taking tiny snips. If it’s very uneven, it might be best to visit a professional stylist who can even it out for you. They have the experience to fix these kinds of things, after all.
If your fringe is too thick, you can thin it out using point cutting or by carefully using thinning shears (if you have them and know how to use them). Remember to only thin the hair from the mid-shaft to the ends, never at the roots, as this can create very short, spiky bits. The goal is to remove bulk, not length, in this case. If it's too thin, you might need to let it grow and incorporate more hair into the fringe section next time. Sometimes, a little bit of volume spray can help a thin fringe look a bit fuller, you know?
Maintaining Your Fresh Fringe
Once you've got your lovely new fringe, keeping it looking great is pretty simple. Regular trims are key to maintaining its shape and length. A fringe tends to grow out quickly, so you'll likely need to trim it every two to four weeks, depending on how fast your hair grows. This keeps it looking fresh and prevents it from getting into your eyes, which can be annoying, honestly.
Styling your fringe can also make a big difference. For a straight fringe, a flat iron can help keep it sleek. For curtain bangs, a round brush and a hairdryer can help create that perfect sweep. Experiment with different products like light hairsprays or dry shampoo to find what works best for your hair type and desired look. You know, just play around with it a bit.
Keeping your fringe clean is also pretty important. Sometimes, you might find your fringe gets greasy faster than the rest of your hair because it's constantly touching your forehead. A quick wash of just your fringe in the sink can refresh it without needing to wash your whole head. Dry shampoo is also a really good friend for those in-between washes, by the way.
Frequently Asked Questions About Cutting Fringes
What kind of scissors should I use?
You should use hairdressing shears, not regular household scissors. Hairdressing shears are much sharper and designed to make clean cuts without damaging your hair. Using dull scissors can lead to split ends and an uneven look, which is pretty much what you want to avoid, right?
Should I cut my fringe wet or dry?
For most fringe styles, especially straight or blunt ones, it's generally best to cut your hair dry. Hair stretches when it's wet and shrinks as it dries, so cutting it wet can lead to a fringe that's much shorter than you intended once it's dry. For wispy or curtain bangs, slightly damp hair might be okay, but always keep in mind the shrinkage factor. It's a pretty big deal, you know?
How often do I need to trim my fringe?
The frequency of trimming depends on how fast your hair grows and the style of your fringe. Generally, a fringe needs to be trimmed every two to four weeks to maintain its shape and keep it out of your eyes. Some people might find they need to do it more often, others less. It's really about personal preference and hair growth rate, basically.
Taking care of your fringe, whether you cut it yourself or get it done professionally, is a simple way to keep your style feeling fresh. Learn more about hair care on our site, and for more specific styling ideas, you can link to this page here. Remember, a little bit of care goes a long way in keeping your hair looking its best.

