Dividing Cells In Excel: Your Complete Guide To Smart Calculations
Detail Author:
- Name : Patsy Nitzsche
- Username : josh86
- Email : ohamill@runte.org
- Birthdate : 1974-09-10
- Address : 5388 Margaretta Rest Apt. 997 Murphytown, WV 59047-8766
- Phone : 248.853.7798
- Company : Sipes-Kulas
- Job : Command Control Center Specialist
- Bio : Eveniet saepe cum doloribus velit. Error asperiores labore ut expedita a autem. Tempore quo incidunt aut reprehenderit asperiores atque. Incidunt mollitia est quo.
Socials
twitter:
- url : https://twitter.com/hilario1545
- username : hilario1545
- bio : Rerum voluptatem commodi neque. Laboriosam vel voluptas unde esse. Atque eum ut vel quis.
- followers : 6698
- following : 1664
facebook:
- url : https://facebook.com/koepp2019
- username : koepp2019
- bio : Et dicta eligendi sed quis eos. Ducimus hic atque pariatur et quibusdam.
- followers : 5263
- following : 844
linkedin:
- url : https://linkedin.com/in/hkoepp
- username : hkoepp
- bio : Aliquid sed est non et ad quia blanditiis.
- followers : 2559
- following : 60
Have you ever found yourself staring at a spreadsheet, needing to split up numbers, or share values evenly, and wondered how Excel makes that happen? It's a common task, and knowing how to divide cells in Excel can really change how you work with your data. So, you know, whether you're breaking down sales figures, splitting expenses, or just doing some quick math, Excel is a powerful helper.
Division, in its simplest form, is about taking a whole and seeing how many equal parts you can get from it. As a matter of fact, it's one of the four main arithmetic operations, right alongside adding, subtracting, and multiplying. You know, just like in basic math, where division is about splitting into equal parts or groups, Excel handles this concept with ease, helping you get to the result of fair sharing.
This guide will walk you through everything about dividing cells in Excel. We'll look at the basic methods, explore how to use formulas, and even touch on some clever tricks. By the end, you'll feel pretty comfortable with all the ways you can divide numbers in your spreadsheets, making your data tasks much simpler, and that's really what it's all about.
Table of Contents
- Understanding Division in Excel: The Basics
- Dividing Numbers in a Single Cell
- Dividing Cells Using Formulas
- Advanced Division Techniques
- Practical Applications and Real-World Scenarios
- Conclusion
Understanding Division in Excel: The Basics
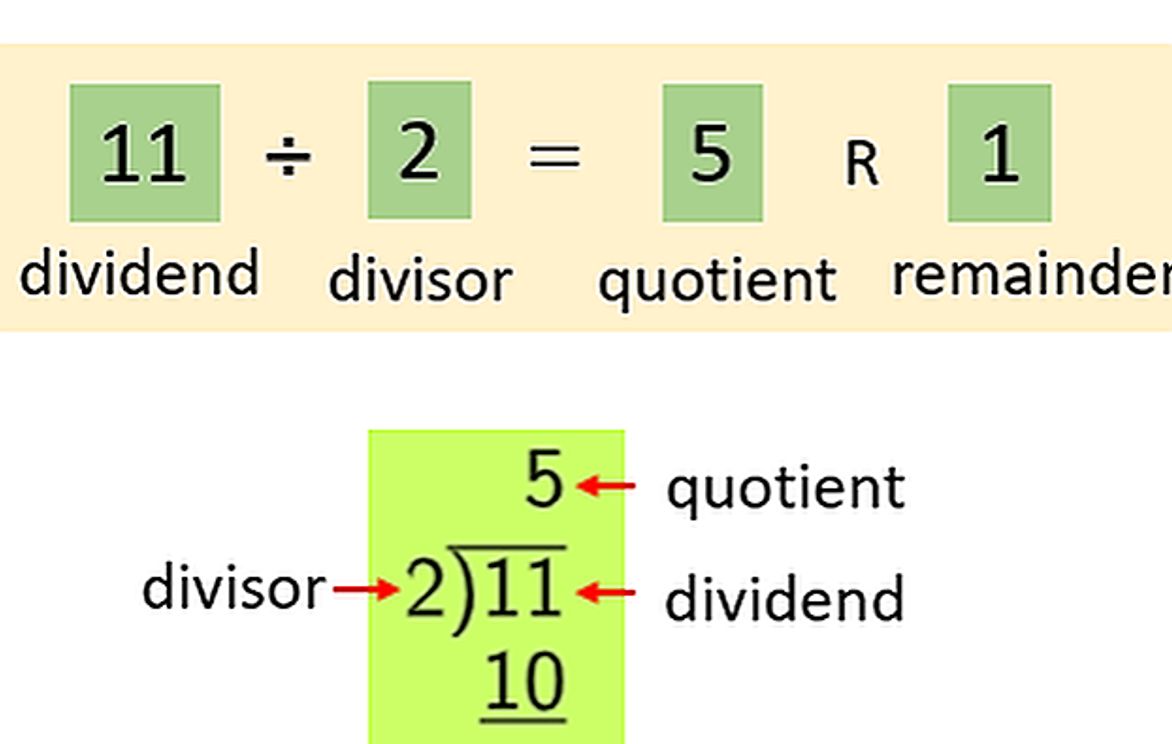
When we talk about division, we're really talking about a fundamental idea. Division is splitting into equal parts or groups, and it is the result of fair sharing. In arithmetic, what is being divided is called the dividend, which is divided by another number, the divisor. The result you get is the quotient. So, you know, Excel handles these mathematical concepts for you, making complex calculations quite simple.
Excel, like any good calculator, understands this basic idea. It uses a specific symbol for division, and once you get that, you're pretty much set for most division tasks. It's a straightforward process, really, and once you grasp the basics, you can apply them to many different situations.
The Division Operator (/)
In Excel, the forward slash (/) is the symbol for division. It's just like how you might see it in a math textbook or on a calculator. Whenever you want to divide one number by another, you'll use this symbol. For example, if you wanted to divide 10 by 2, you would write "10/2". This simple symbol is, in a way, your key to doing division inside your spreadsheets.
This operator is quite important because it tells Excel exactly what kind of calculation you want to perform. Without it, Excel wouldn't know you mean to divide. It's, you know, a universal sign for splitting numbers apart, and Excel understands it perfectly. So, remember that forward slash, it's your friend here.
Simple Cell Division
To divide in Excel, you always start with an equals sign (=) in the cell where you want the answer to appear. This tells Excel that you're about to enter a formula. After the equals sign, you'll put the number or cell reference you want to divide, then the division operator (/), and finally the number or cell reference you want to divide by. It's a pretty clear sequence, actually.
For instance, if you wanted to divide the value in cell A1 by the value in cell B1, your formula would look like this: `=A1/B1`. That's it. Excel will then calculate the answer and show it in the cell where you typed the formula. This method is, sort of, the backbone of most division tasks you'll do.
Dividing Numbers in a Single Cell
Sometimes, you just need to do a quick division calculation right there in one cell, without referencing other cells. This is very simple to do. You just type the equals sign, followed by the numbers you want to divide, with the division symbol between them. For example, if you wanted to find out what 100 divided by 4 is, you would type `=100/4` into any cell.
When you press Enter, Excel will show you the answer, which is 25 in this case. This is useful for quick calculations or when you have static numbers that won't change. It's, you know, like using a mini-calculator right inside your spreadsheet, which can be pretty handy for immediate answers.
This method is straightforward and doesn't require any cell references, which makes it good for one-off calculations. You just type in the numbers, and Excel does the work. It’s a pretty basic, but often used, way to handle division.
Dividing Cells Using Formulas
Most of the time, you'll be dividing values that are already in other cells. This is where the real power of Excel comes in, as it allows your calculations to be dynamic. If the numbers in the referenced cells change, your division result updates automatically. This is, in a way, one of Excel's best features for data management.
Dividing One Cell by Another
This is perhaps the most common way to divide in Excel. You simply reference the cells that hold the numbers you want to work with. Let's say you have a total amount in cell C5 and you want to divide it by the number of items in cell D5. You would go to an empty cell, say E5, and type `=C5/D5`.
After you press Enter, cell E5 will show the result of C5 divided by D5. If you later change the value in C5 or D5, the result in E5 will instantly update. This makes your spreadsheet quite flexible, allowing for easy adjustments. It's, in some respects, the core of how Excel handles linked data.
This method is very useful for things like calculating average costs or determining per-unit values. You point to the cells, and Excel does the math. It's a rather simple yet effective approach for many everyday tasks.
Dividing a Column by a Constant Number
Imagine you have a list of sales figures in column A, and you want to divide each of them by a specific constant number, like 12 (to get monthly averages from annual totals, for example). You don't want to type "12" into every single formula. So, you know, there's a better way.
You can put your constant number in a separate cell, say cell B1. Then, when you write your formula for the first cell in column A (let's say A2), you'd type `=A2/$B$1`. The dollar signs ($) before the B and the 1 make the reference to cell B1 an "absolute reference." This means that when you copy this formula down the column, it will always refer back to cell B1 for the divisor.
To copy the formula, you just click on the cell with the formula (E.g., B2), then grab the small square at the bottom-right corner of the cell (the "fill handle"), and drag it down. Excel will automatically adjust the A2 part of the formula (to A3, A4, etc.) while keeping B1 fixed. This is a pretty efficient way to apply the same division across a whole set of data.
This technique saves a lot of time and reduces the chance of errors. It's, like, a really clever feature for handling repetitive calculations where one part of the equation stays the same. You set it once, and it works for everything.
Dividing Two Columns
Often, you'll need to divide values from one column by values in another column, row by row. For example, if column A has total units sold and column B has total revenue, you might want to calculate the revenue per unit in column C. This is, in a way, a very common scenario.
You would start by creating the formula for the first row. In cell C2, you might type `=B2/A2`. This divides the revenue for the first item by the units sold for that same item. It's, you know, a direct calculation for that specific row.
Once you have that formula in C2, you can use the fill handle (the small square at the bottom-right of cell C2) to drag the formula down column C. Excel will automatically adjust the cell references for each row (e.g., C3 will become `=B3/A3`, C4 will be `=B4/A4`, and so on). This is a pretty quick way to populate an entire column with division results.
This method is incredibly powerful for analyzing related data across your spreadsheet. It allows you to quickly generate new insights from your existing numbers. So, it's almost a must-know technique for anyone working with tabular data.
Advanced Division Techniques
While formulas are great, Excel offers other ways to handle division, especially when you want to apply a single division factor to a range of numbers without adding new formulas. There are, you know, some neat tricks that can save you time.
Using Paste Special for Division (without formulas)
This is a lesser-known but very powerful trick. Imagine you have a list of numbers in a column, and you want to divide every number in that list by, say, 10, without creating a new column with formulas. Paste Special can do this. It's, in a way, like a magic wand for bulk operations.
- First, type the number you want to divide by (e.g., 10) into any empty cell. Let's say you put it in cell F1.
- Copy that cell (F1) by pressing Ctrl+C (or right-click and choose "Copy").
- Now, select the range of cells you want to divide. For example, if your numbers are in A1 to A10, select that range.
- Right-click on the selected range, and choose "Paste Special..." from the menu.
- In the "Paste Special" dialog box, under the "Operation" section, select "Divide."
- Click "OK."
Every number in your selected range will now be divided by the number you copied (10 in our example), and the original values will be replaced with the results. No formulas are left behind, just the new numbers. This is, you know, an incredibly efficient way to perform a mass division without cluttering your sheet with extra columns.
This technique is particularly useful for data cleanup or quick adjustments to a large dataset. It's a pretty neat shortcut that many people don't realize exists. It can really speed up your work, honestly.
Handling Errors (#DIV/0!)
Sometimes, when you divide in Excel, you might see an error message like `#DIV/0!`. This happens when you try to divide a number by zero, which is mathematically impossible. It's a common issue, and Excel is just telling you it can't complete the calculation. So, you know, it's important to know how to deal with it.
To prevent this error from showing up, you can use the `IFERROR` function. This function checks if a formula results in an error. If it does, you can tell Excel to display something else instead, like a blank cell, a dash, or a specific message. It's, in a way, like putting a safety net around your formulas.
For example, if your original division formula was `=A2/B2`, you could wrap it in `IFERROR` like this: `=IFERROR(A2/B2, "")`. The `""` tells Excel to display nothing (a blank cell) if the division results in an error. You could also put a zero, a dash, or "N/A" there instead. This makes your spreadsheet look much cleaner and more professional.
Another way to manage this is to check if the divisor cell is empty or zero before performing the division. You could use an `IF` statement for this. For example: `=IF(B2=0,"",A2/B2)`. This means "If B2 is zero, show nothing; otherwise, divide A2 by B2." This approach gives you more control over the logic. It's, like, a bit more involved but offers greater precision.
Learning to handle these errors is a key part of making robust spreadsheets. It prevents unsightly error messages and makes your data easier to read. So, you know, it's a good skill to have in your Excel toolkit.
Practical Applications and Real-World Scenarios
The ability to divide cells in Excel is incredibly versatile, useful in so many different areas. Just like how division in arithmetic helps us understand how many times one number fits into another, or how to share things fairly, Excel applies this to data. For instance, division is splitting into equal parts or groups, and it is the result of fair sharing. This concept is fundamental to many real-world problems that Excel helps solve.
Think about managing a budget. You might have a total budget amount in one cell and need to divide it by the number of months in a year to get a monthly allowance. Or perhaps you have a total project cost and want to divide it by the number of team members to see each person's share. This is, you know, a very common use.
In business, you might divide total sales revenue by the number of units sold to figure out the average price per unit. Or you could divide total expenses by the number of employees to get a per-employee cost. These are all scenarios where knowing how to divide cells quickly and accurately becomes very important. It's, in some respects, about gaining clearer insights from your numbers.
For students, it could mean dividing total points earned by the maximum possible points to calculate a percentage grade. Researchers might divide the total number of observations by categories to find proportions. The concept of division, where what is being divided is called the dividend, which is divided by the divisor to get a quotient, really comes alive in these practical applications. It allows us to make sense of quantities and relationships in data. You can learn more about data analysis on our site, which often involves these basic operations.
Even if you're just tracking personal finances, dividing your total spending by categories can help you understand where your money goes. The ability to split figures, to see how many times one value fits into another, is a foundational skill that Excel makes simple. So, you know, it's pretty much essential for anyone working with numbers.
The enduring power of Excel lies in its capacity to take these basic arithmetic operations, like division, and apply them to vast amounts of data with ease. It truly helps bring a new era of data understanding for many people. To explore more Excel functions, you can also check out this page for additional tips and tricks.
Conclusion
Dividing cells in Excel is a fundamental skill that opens up a world of possibilities for data analysis and management. Whether you're using simple formulas with the forward slash, leveraging absolute references for efficiency, or employing advanced techniques like Paste Special, Excel provides flexible ways to handle division. Remember, just like in basic arithmetic, division is about splitting values into equal parts, and Excel helps you achieve that with your data. So, you know, mastering these methods will certainly make your work with spreadsheets much smoother and more accurate.